This post involves a look into Microsoft’s proprietary NT LAN manager (NTLM) and its dependency on HTTP keep alives.
The client in this “tale” reported that their SharePoint site was available over the Internet via their proxy server (in this case ISA Server 2006), but not from within the server farm. In this scenario, they were attempting to use to provide workflow based business logic to their SharePoint 2007 site – and repeatedly getting a (Unauthorized: Access is denied due to invalid credentials).
The first thought that sprang to mind was the now infamous post-Windows Server 2003 SP1 that I imagine is very well known within the SharePoint community (it’s annoying when it occurs on a development VM for example). For those not in the know, accessing a Web site locally on a server with a custom host header (i.e. the Web site is not equal to the server name) will result in a HTTP 401 error message – which basically means you can’t log on to your site. However, upon further investigation, the loopback check no longer seemed relevant given that K2 was hosted on a separate server to the IIS Web site host.
Given that the client had a selection of SharePoint WFE servers to choose from (and in the interests of isolating the issue), I decided to bypass DNS and point the K2 server’s host file to an alternate Web server (something that I would not recommend doing in a production environment for any longer than is necessary – it causes havoc if left forgotten). To my surprise, I was able to authenticate using NTLM without any issues on my cherry-picked server – leading me to believe there was an IIS configuration error on the original server.
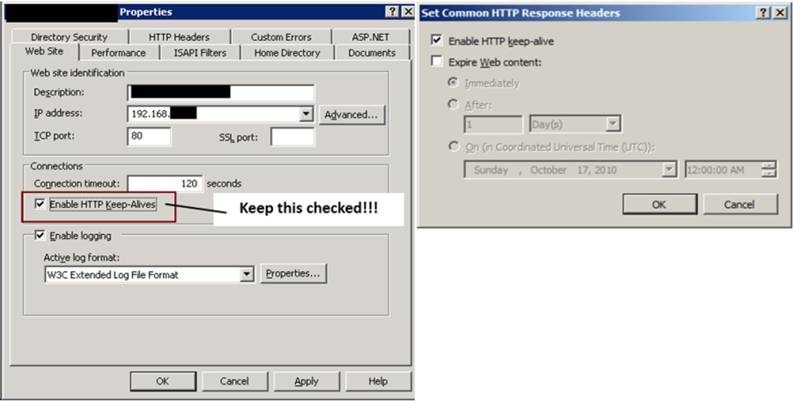
Sure enough, the “Enable HTTP Keep-Alives” check box in IIS (6) was not selected for whatever reason (it’s on by default). The keep-alive response header improves performance by keeping connections open across multiple requests – and more importantly it is required for NT LAN manager to operate correctly. I will look at this in more detail below but thought I would show you the resolution first given that a dive into the workings of the NTLM protocol is not for everyone.
In order to avoid confusion the screenshots below represent how your site settings should look. Note that in IIS 7 the option is found under Features View > HTTP Response Headers > Set Common HTTP Response Headers as detailed in I don’t think you will need any help finding the option in IIS 6 given that it is on the default site property tab.
Enabling HTTP Keep-Alives in IIS 6.0 (left) and IIS 7.0 (right).
A brief look into the NTLM authentication scheme
For those of you still reading I assume that you are interested in learning a little more about the NTLM protocol and perhaps would like an explanation as to why HTTP keep-alives are required for it to operate correctly. Whilst I’m no expert in this area I have pulled together numerous resources online – and used quite extensively – to provide what I consider a reasonably concise explanation. Thanks go to Ronald Tschalär here for – in his own words – (the NTLM scheme is proprietary) by using a variety of resources available online and through reverse engineering the protocol way back in 2003. Thanks also go to Eric Glass for his article entitled “” which includes a ton of useful information.
Here is a brief explanation of the NTLM HTTP authentication mechanism. I group the various stages in pairs due to the fact that Fiddler provides both client request and server response together. The individual steps are Copyright © 2003, 2006 Eric Glass; the screenshots are mine :-).
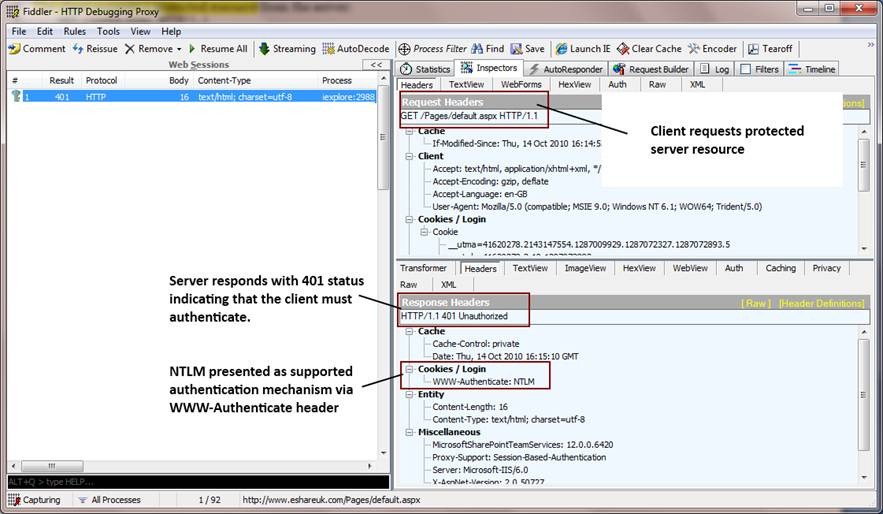
Stages 1 and 2: Client requests protected resource and server indicates need to authenticate (HTTP Keep-Alive Enabled)
- 1. The client requests a protected resource from the server
GET /index.html HTTP/1.1
2. The server responds with a 401 status, indicating that the client must authenticate. “NTLM” is presented as a supported authentication mechanism via the “WWW-Authenticate” header. Typically, the server closes the connection at this time:
HTTP/1.1 401 Unauthorized
WWW-Authenticate: NTLM
Connection: close
Stages 1 and 2: Client requests protected resource and server indicates need to authenticate (HTTP Keep-Alive Enabled)
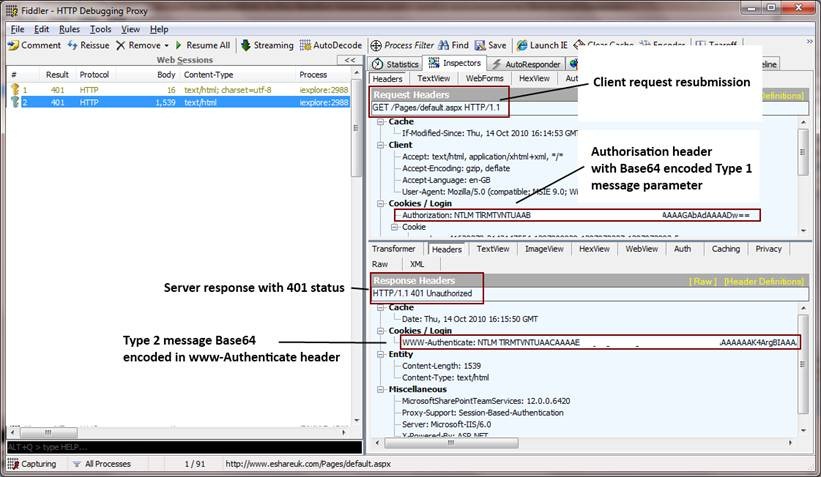
Stages 3 and 4: client resubmits request with Type 1 message parameter, server replies with Type 2 message (HTTP Keep-Alive Enabled)
- The client resubmits the request with an “Authorization” header containing a Type 1 message parameter. The Type 1 message is Base-64 encoded for transmission. From this point forward, the connection is kept open; closing the connection requires reauthentication of subsequent requests. This implies that the server and client must support persistent connections, via either the HTTP 1.0-style “Keep-Alive” header or HTTP 1.1 (in which persistent connections are employed by default). The relevant request headers appear as follows (the line break in the “Authorization” header below is for display purposes only, and is not present in the actual message):
GET /index.html HTTP/1.1
Authorization: NTLM TlRMTVNTUAABAAAABzIAAAYABgArAAAACwALACAAAABXT1JLU1RBVElPTkRPTUFJTg==
- The server replies with a 401 status containing a Type 2 message in the “WWW-Authenticate” header (again, Base-64 encoded). This is shown below (the line breaks in the “WWW-Authenticate” header are for editorial clarity only, and are not present in the actual header).
HTTP/1.1 401 Unauthorized
WWW-Authenticate: NTLM TlRMTVNTUAACAAAADAAMADAAAAABAoEAASNFZ4mrze8… (trimmed to save space)
Stages 3 and 4: client resubmits request with Type 1 message parameter, server replies with Type 2 message (HTTP Keep-Alive Enabled)
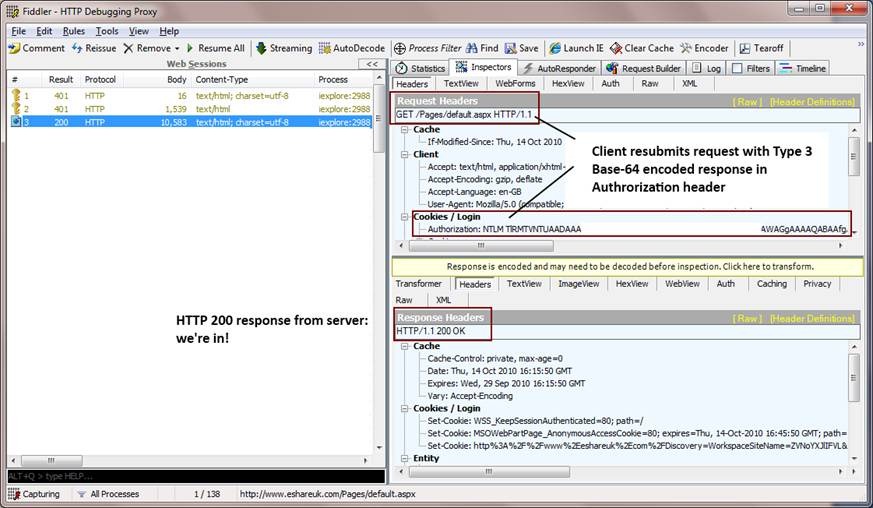
Stages 5 and 6: client resubmits request with Type 3 message parameter, server validates and returns 200 (HTTP Keep-Alive Enabled)
- The client responds to the Type 2 message by resubmitting the request with an “Authorization” header containing a Base-64 encoded Type 3 message (again, the line breaks in the “Authorization” header below are for display purposes only):
GET /index.html HTTP/1.1
Authorization: NTLM TlRMTVNTUAADAAAAGAAYAGoAA… (trimmed to save space)
- Finally, the server validates the responses in the client’s Type 3 message and allows access to the resource.
HTTP/1.1 200 OK
Stages 5 and 6: client resubmits request with Type 3 message parameter, server validates and returns 200 (HTTP Keep-Alive Enabled)
OK, what does this have to do with keeping HTTP Keep-Alive enabled?
As detailed in “You must enable the HTTP keep-alive response header when you useintegrated security or connection-based authentication services, such as Integrated Windows authentication.”
“Connection oriented” in the context of an authentication protocol such as NTLM basically means that each HTTP request after the first are not themselves authenticated; the protocol relies on a stable connection between client and server. This is particularly the case during the NTLM handshake process detailed above – indeed, if HTTP keep alive is not enabled on either the client or server the handshake will fail, and a dropped connection results in the server repeatedly reinitiating the handshake.
Rather than babble on about this any longer let’s look at an example.
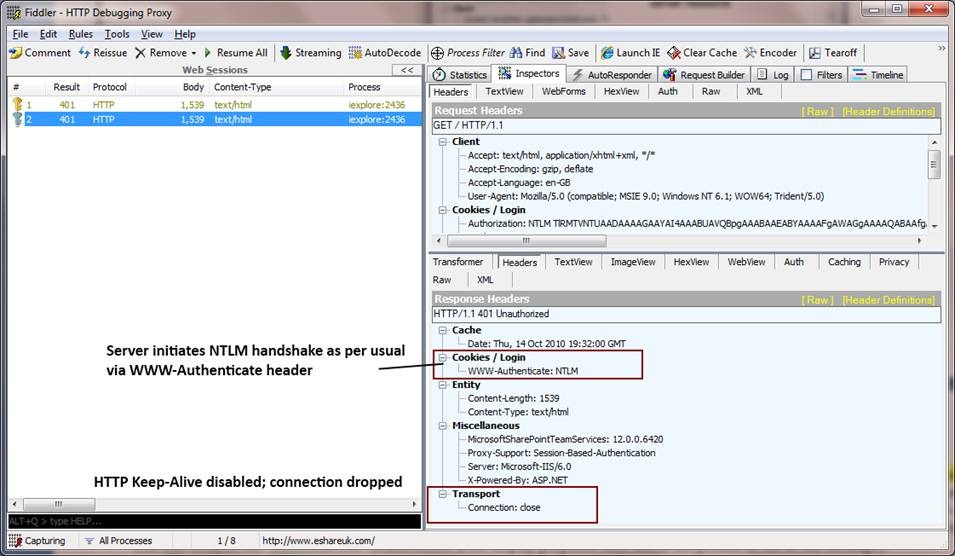
Stages 1 and 2: Client requests protected resource and server indicates need to authenticate (HTTP Keep-Alive Disabled)
This stage starts out as per usual: the client requests a protected resource and the server responds by initiating the NTLM handshake (with a 401 and WWW-Authenticate header indicating support for integrated authentication).
However, this time you will notice that a “Transport” response header is sent indicating that the connection has been closed (dropped):
Stages 1 and 2: Client requests protected resource and server indicates need to authenticate (HTTP Keep-Alive Disabled)
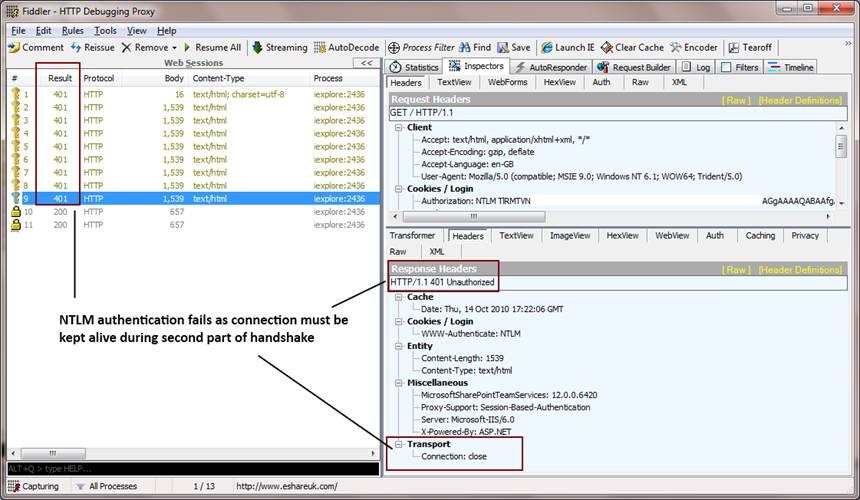
Stages 3 and later: client resubmits request with Type 1 message parameter, server replies with Type 2 message (HTTP Keep-Alive Disabled)
The later stages of the NTLM handshake clearly illustrate the need to enable HTTP Keep-Alives whilst using integrated authentication.
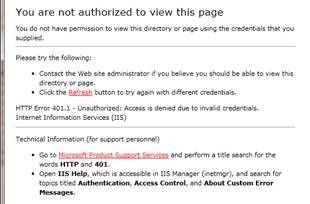
Due to the connection drop, the server will repeatedly reinitiate the handshake, eventually resulting in your browser providing an unauthorised access (401) error page:
Stages 3 and later: client resubmits request with Type 1 message parameter, server replies with Type 2 message (HTTP Keep-Alive Disabled)
Repeated attempts to access a resource with NTLM without HTTP keep-alives will result in a “You are not authorized to view this page” error.
Conclusion
· HTTP Keep-Alives are required in order for integrated authentication to function due to the need to maintain a connection for the duration of the NTLM initialisation handshake.
· HTTP Keep-Alive is enabled by default in both IIS 6 and 7.
I hope this information was useful to you – I certainly found it interesting whilst reading around this problem in the context of SharePoint.
hi, may i ask if I have a cisco load balancer, what file should I monitor in Sharepoint for keep-alive session? Please advise. thank you.